
Resources, How To Guides
14 min read
Last updated:
Node.js is an open-source runtime environment, frequently used for backend development, and enables developers to build scalable, high-performance apps that can easily handle a vast amount of simultaneous connections. The solution is suitable for network applications scalable for real-time web apps, RESTful APIs, microservices, and chat apps.
The speed and scalability of Node.js make it an ideal choice for businesses that need to build apps that can handle high traffic volumes and need to be fast and efficient, which has led to the tool's rise in popularity. This increase in popularity has facilitated the need for effective monitoring techniques, such as Node.js monitoring, and specifically Node.js APM.
This article is part of Logit.io’s how-to guide series, it will outline what Node.js is, its architecture, and how it stacks up against Golang. Before outlining an integration guide detailing how simple it is to begin sending Node.js traces to Logit.io for monitoring, analysis, and visualization.
Contents
What is Node.js?
Node.js is an open-source runtime environment that executes JavaScript code on the server side and is favored for web development. Commonly, JavaScript is used for client-side scripting in web browsers, and with the advancement of Node.js, developers were able to use the same language for backend development.
Node.js runs on the V8 JavaScript engine from Google Chrome making it efficient and quick. The event-driven, non-blocking I/O model allows Node.js to manage all requests parallel without blocking the execution thread. Also, Node.js enjoys the benefits of a rich ecosystem of libraries and packages through its package manager, npm, or Node Package Manager, offering access to various modules available for any developer to integrate into their projects.
Is Node.js a Framework?
When discussing Node.js, numerous users ask, is Node.js a framework, and the simple answer is No, Node.js is not a framework. It is a runtime environment for executing JavaScript code outside of a browser. It uses Google's V8 JavaScript engine to enable JavaScript to run on the server side, making it possible to build backend applications with JavaScript. Frameworks like Express.js, Nest.js, or Koa are built on top of Node.js to offer structured workflows for web application development, but Node.js itself is just the environment that allows JavaScript to function on the server side.
Node.js Architecture
Node.js is built on a single-threaded (unlike traditional server-side platforms that often rely on multi-threading to handle simultaneous connections), event-driven architecture designed to handle many concurrent connections with high throughput. This ensures Node.js is scalable, powerful, and perfectly suited for real-time applications.
Single-Threaded Event Loop
A key component of Node.js’ architecture is that it's designed on a single-threaded event-driven non-blocking I/O model, meaning it uses only one thread to handle thousands and thousands of client requests simultaneously to avoid memory leaks. This is conducted via an event loop that regularly checks for any events or tasks and executes them. Once an operation is done, the event loop moves on to the next one, enabling Node.js to easily handle thousands of requests parallel to each other with limited overhead and achieve such high efficiency and performance.
Non-Blocking I/O
A key concept in Node.js is how all the I/O operations are non-blocking. In other words, instead of waiting until the read operation of a file is completed, or data arrives from a database, Node.js triggers the start of the operation and immediately moves on to process the next tasks. When the operation is finished, Node.js runs a callback function to process the results. By nature, this non-blocking makes Node.js more capable of handling heavy I/O-bound tasks than synchronous blocking methods can handle. This design is ideal for applications that require real-time interaction or deal with a huge number of concurrent requests, such as chat applications, gaming servers, and live-streaming services.
V8 Javascript Engine
Node.js uses the V8 JavaScript engine, which was developed by Google and is famous for its speed and efficiency. V8 compiles JavaScript directly into native machine code, significantly increasing execution speed. Because of this, Node.js can run JavaScript on the server side with great performance and can be used for I/O-intensive operations. Furthermore, optimization techniques in the V8 engine, such as inline caching and hidden classes, enhance Node.js performance, making it competitive with traditionally faster languages like C++ and Java.
Modules and Package Management
The tool is designed to be modular, allowing developers to break an app into smaller pieces of reusable code called modules. This modularity enables each module to contain a specific function, that is easier to import into other parts of an application and is maintainable and easy to enhance. Node Package Manager, as its main part, serves for the normalization of architecture through a register of thousands of open-source packages and modules. This makes the package manager useful for sharing and reusing code, which quickens the development process. As a result, configuring, installing, updating, and managing dependencies to prototype and build a complex application are simple for developers.
Native API Integration
Node.js has a powerful set of native APIs that support networking, access to the operating system, and other low-level operations. This makes Node.js better for developing desktop applications, command-line tools, and IoT solutions. Native APIs are well optimized to leverage the non-blocking I/O model, performing operations without delays. Also, with the help of state-of-the-art frameworks like Node-API, Node.js easily integrates with C/C++ libraries.
Golang vs Node.js: Which is Best for Your Project?
Golang and Node.js are two tools that have gained significant popularity in recent years, due to their abilities in assisting developers to construct robust and highly scalable applications. If you’re looking for a quick synopsis of which is the better tool, you will find that Golang leads the way for GitHub stars over Node.js, but obviously, this isn’t conclusive. So, we will delve into various aspects of the tools to assist you in determining which is best for your project.
Golang: Pros
Go is a statically compiled language, meaning that its code has to be converted into machine-level instructions before execution. This fact leads to optimized and efficient code with fast execution. Most of the time, its performance is comparable with low-level programming languages such as C or C++. As a result, Go will be the perfect fit for building high-performance applications. Additionally, Go natively supports concurrency using goroutines and channels. Goroutines are lightweight and efficient, and handling thousands of concurrent tasks is relatively inexpensive. This makes Go fit for applications requiring high levels of concurrency, like web servers real-time systems, or even data processing pipelines.
Another standout feature of Go is that the syntax of Go is simple, clear, and readable, minimizing the learning curve and, helping teams maintain consistency across their codebases. By design, the language omits complex features such as inheritance, function overloading, circular dependencies, and macros.
Lastly, Go includes a powerful standard library that already contains many built-in packages that handle common tasks, such as HTTP handling, file manipulation, text processing, and cryptography. Internally, this reduces the dependencies of the code and makes the application easily built using only a few third-party libraries.
Node.js: Pros
Focusing on the benefits of Node.js, to begin with, Node.js offers a vast ecosystem in which npm (Node Package Manager) provides more than one million libraries and packages for almost any kind of functionality. Developers get pre-built modules, which save time and effort. As well as a large community around Node.js offers a great number of tutorials, tools, frameworks, and support.
In addition, Node.js allows developers to write server- and client-side scripts in JavaScript providing an opportunity for full-stack development in just one language. This helps reduce the hassles of knowing too many languages, making the development process easy. Apart from this, it also supports sharing code between both client and server sides, increasing the level of productivity and maintainability.
Another key benefit of Node.js is it’s lightweight, making it suitable for microservices architecture. It has a small footprint and a fast startup time, hence it is perfect for containerized environments and serverless deployments. This efficiency enables it to scale up or down quickly and be responsive for use in cloud-native applications.
Lastly, Node.js is cross-platform, the environment runs on all major types of OS like Windows, macOS, and Linux. That would enable the developers to have the comfort of writing once and deploying anywhere, hence facilitating the development and deployment processes in varied environments.
Golang: Cons
While Golang offers powerful features it isn’t without its limitations. Firstly, Go lacks some advanced features available in other languages, such as generics (though basic support was included in Go 1.18), metaprogramming, and functional programming constructs like map/filter/reduce. This might feel limiting to developers who are used to more expressive languages, like Python, Java, or Scala.
Also, Go makes explicit error handling by returning errors as values, which the developer should explicitly check. This results in very reliable but verbose code with lots of repetition, especially in a bigger application.
Another disadvantage of Golang is that although garbage collection is provided, and simplifies memory management, it can introduce some overhead, especially for latency-sensitive applications. The Go team has continuously improved the garbage collector over time, however, it may still not be as predictable as explicit memory management found in languages like C or C++.
Lastly, the Go ecosystem is relatively small compared to more mature languages such as Java, Python, or JavaScript. It has grown significantly, but sometimes third-party libraries or even some specialized frameworks will either be unavailable or not quite as mature, meaning it's up to the developers to build custom implementations or wrappers.
Node.js: Cons
Just as Golang has its drawbacks, so does Node.js. Firstly, it's single-threaded by design, which limits the load when CPU-bound operations are considered. Node.js handles I/O-bound operations very efficiently, but once there is heavy computation or any other CPU-intensive activity, it stutters. This could be mitigated with mechanisms like offloading such tasks to worker threads or off-loading to external services, but it would make Node.js less apt for applications with hard computational work.
Likewise, even though npm houses a huge number of packages, not all packages are properly maintained or considered mature. The sheer size of the ecosystem alone ensures that quality varies dramatically, security is inconsistent, and documentation may not be sufficient, occasionally inflicting dependency problems or security implications unless one is careful.
Continuing with Node.js’ limitations, another is that error handling can become cumbersome in Node.js, especially when dealing with asynchronous code. The developer has to be careful and diligent in handling errors in callbacks, promises, and async functions to avoid unhandled exceptions or an application crash. If a user fails to handle errors properly, it leads to unwanted behavior, which is hard to debug.
Lastly, applications built with Node.js, because of JavaScript and the V8 engine, may have higher memory consumption compared to applications written in systems-level languages like C or Go. This is a drawback for applications that need to run on resource-constrained environments, IoT devices, or extremely light containers.
Logit.io APM for Node.js Monitoring
Logit.io offers a powerful and cost-effective application performance monitoring (APM) platform that allows you to effectively monitor your Node.js traces. Our solution supplies APM and trace analytics without vendor lock-in, data egress fees and displays transparent easy to understand billing. You also gain access to OpenSearch and the ELK Stack alongside the metrics monitoring capabilities of managed Grafana. If you’re interested in finding out more about Logit.io’s APM solution for Node.js monitoring then don’t hesitate to contact us, or begin exploring the platform for yourself with a 14-day free trial.
Unlock complete visibility with hosted ELK, Grafana, and Prometheus-backed Observability
Start Free TrialHow to use Node.js with Logit.io
Conduct Node.js APM and Node.js monitoring by integrating Node.js with Logit.io. The process is simple and Logit.io’s APM solution offers enhanced visibility with powerful tools such as Hosted Jaeger, enabling you to perform enhanced monitoring and analysis. With Logit.io, Node.js APM is straightforward, you can view details of your Node.js traces directly in the Logit.io dashboard or launch Hosted Jaeger or Grafana for an in-depth view of this data.
You can view the full Node.js integration in our documentation that outlines how to ship traces from Node.js to Logit.io with OpenTelemetry which can be sent via gRPC or HTTPS. Here we will outline the process for sending Node.js data to Logit.io via gRPC.
1. Install
Create a new folder for the project called opentelemetry_nodejs_example and then open the command prompt or terminal window and navigate to the folder. Paste in the following command:
npm init -y
This will create a package.json file with default settings.
This guide uses the Express framework to simplify handling HTTP requests. Next, we need to paste the following command into the command prompt or terminal window:
npm install express
You will now have a node_modules folder in addition to the package.json and a package-lock.json file.
We now need to install the necessary OpenTelemetry packages using npm (node package manager), the packages that we will be using are as follows:
opentelemetry-api:Core API for OpenTelemetryopentelemetry-sdk:SDK implementationopentelemetry-exporter-trace-otlp-grpc:Exporter to send data to the OpenTelemetry Collector or other OTLP-compatible backends using grpcopentelemetry-exporter-trace-otlp-http:Exporter to send data to the OpenTelemetry Collector or other OTLP-compatible backends using httpsopentelemetry-instrumentation-node:Automatically instrument your node applications for tracing with OpenTelemetry
We install them with the following command.
npm install @opentelemetry/api @opentelemetry/sdk-node @opentelemetry/auto-instrumentations-node @opentelemetry/sdk-trace-base @opentelemetry/exporter-trace-otlp-http @opentelemetry/exporter-trace-otlp-grpc
Create three new files and name them app.js, tracing.js and config.js.
Open the tracing.js file with your choice of text editor, copy and paste the following code into the file, and then save.
const config = require('./config');

const { NodeSDK } = require('@opentelemetry/sdk-node');
const { getNodeAutoInstrumentations } = require('@opentelemetry/auto-instrumentations-node');
const { Resource } = require('@opentelemetry/resources');
const { SemanticResourceAttributes } = require('@opentelemetry/semantic-conventions');
const { OTLPTraceExporter } = require(`@opentelemetry/exporter-trace-otlp-${config.protocol}`);
let sdk = new NodeSDK();
let channelCredentials = null;
let traceExporter = new OTLPTraceExporter();

// Define the service name
const serviceName = 'LogitNodeJSTestApp';

// Encode the username and password for Basic Authentication
const auth = Buffer.from(`${config.username}:${config.password}`).toString('base64');

if (config.protocol === "grpc") {
  const OTLP_ENDPOINT = `grpc://${config.endpoint}:${config.port}`;
  const grpc = require('@grpc/grpc-js');
  const { credentials } = grpc;
  const metadata = new grpc.Metadata();
  metadata.set('authorization', `Basic ${auth}`);

  // Create gRPC credentials with Basic Auth
  channelCredentials = credentials.combineChannelCredentials(
    credentials.createSsl(), // Use SSL credentials if your endpoint requires it
    credentials.createFromMetadataGenerator((_params, callback) => {
    callback(null, metadata);
    })
  );

  // Configure the OTLP trace exporter with gRPC and Basic Auth
  traceExporter = new OTLPTraceExporter({
    url: OTLP_ENDPOINT,
    credentials: channelCredentials,
  });

  // Create a new Node SDK instance with automatic instrumentation
  sdk = new NodeSDK({
    traceExporter,
    instrumentations: [getNodeAutoInstrumentations()],
    resource: new Resource({
    [SemanticResourceAttributes.SERVICE_NAME]: serviceName,
    }),
  });
} else {
  const OTLP_ENDPOINT = `https://${config.endpoint}:${config.port}/v1/traces`;

  // Create HTTPS credentials with Basic Auth
  traceExporter = new OTLPTraceExporter({
  url: OTLP_ENDPOINT,
  headers: {
    'Authorization': `Basic ${auth}`
    }
  });

  // Create a new Node SDK instance with automatic instrumentation
  sdk = new NodeSDK({
  traceExporter,
  instrumentations: [getNodeAutoInstrumentations()],
  resource: new Resource({
    [SemanticResourceAttributes.SERVICE_NAME]: serviceName,
    }),
  });
}

// Initialize the SDK and start the tracing
sdk.start();
Next open the app.js file with your text editor, copy and paste the following code into the file and then save.
// Import and initialize OpenTelemetry
require('./tracing');

const express = require('express');
const app = express();

app.get('/', (req, res) => {
  res.send('Hello, World!');
});

const PORT = process.env.PORT || 3000;
app.listen(PORT, () => {
  console.log(`Server is running on http://localhost:${PORT}`);
});
2. Configuring the App
Open the config.js file using your text editor, copy and paste the following into the file, and then save. The full integration guide allows you to use the tab to choose between sending via HTTPS or gRPC, this example will show you how to send via gRPC.
// config.js
module.exports = {
  endpoint: "<your-otel-endpoint-address>",
  port: "<your-otel-endpoint-grpc-port>",
  protocol: "grpc",
  username: '<your-otel-username>',
  password: '<your-otel-password>',
};
3. Run the Node.js App
Run the NodeJS app with the following command in Terminal or the Command Prompt window.
node app.js
You will see feedback from the app so that you know that is running, the message should say "Server is running on http://localhost:3000".
The action of launching the NodeJS app will have sent traces to your stack which can now be viewed in Jaeger.
How to Visualize Node.js Traces in Logit.io
The Logit.io platform offers hosted solutions for a range of open-source visualization tools, including Grafana, Kibana, and Jaeger. By eliminating the complexities and time involved in configuring and maintaining these tools, Logit.io allows you to quickly start focusing on what matters most to your organization, monitoring and ensuring the uptime of your applications.
To begin conducting Node.js APM and Node.js monitoring in Logit.io, you will need to have already configured Node.js to ship traces to Logit.io, which can be achieved by following the steps listed above or by using the instructions in the integration guide. To begin with ‘visualizers’ for Node.js traces we recommend using Jaeger as this can be launched from the ‘Application Performance Monitoring’ section.
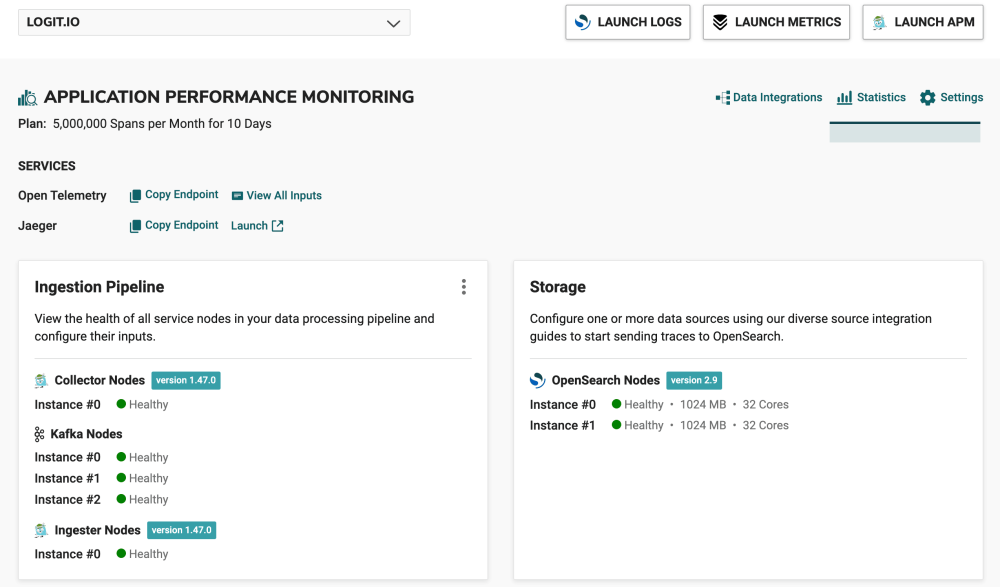
- Launch APM: From the initial dashboard, scroll down to the Application Performance Monitoring (APM) section, and under ‘Services’ you’ll see Jaeger, select ‘Launch’, or in the top right of your screen select ‘Launch APM’
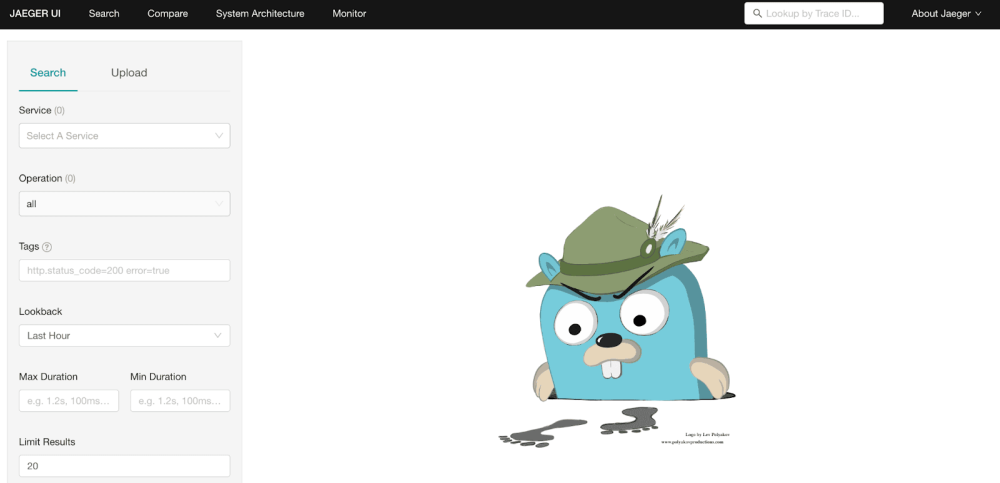
- Jaeger: After selecting ‘Launch APM’ or ‘Launch’ you will arrive at the Jaeger UI search page.
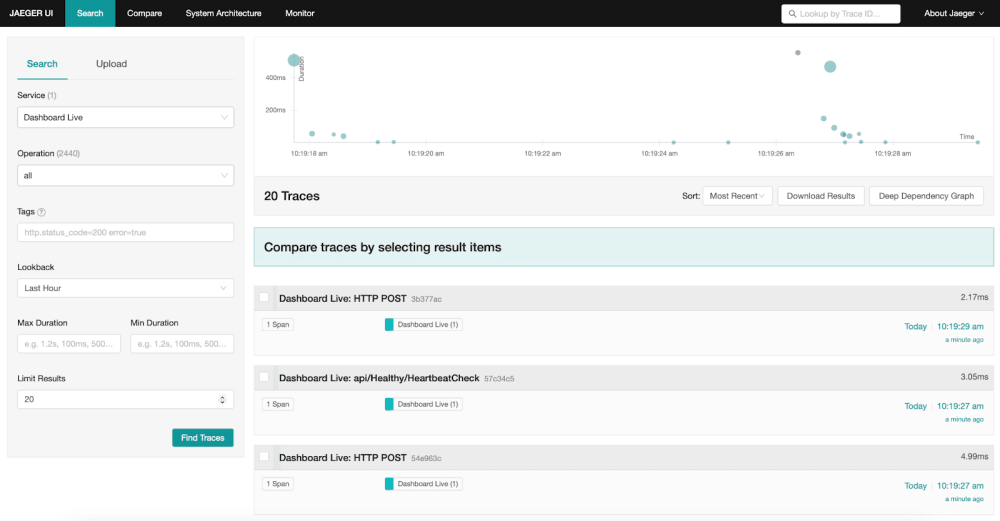
- Visualize Node.js Data: From this page, you can view all your ingested Node.js traces for effective Node.js monitoring. Hosted Jaeger enables you to drill down into specific traces, view service dependencies, analyze latency distributions, and more, making it easier to pinpoint the root causes of performance issues.
If you've enjoyed this article why not read How to Integrate Java with Logit.io or How to Integrate Ruby with Logit.io next?